 |
START WITH SCIENCE KITS
Science Programs for Children Ages 4 and 5 |
Objectives
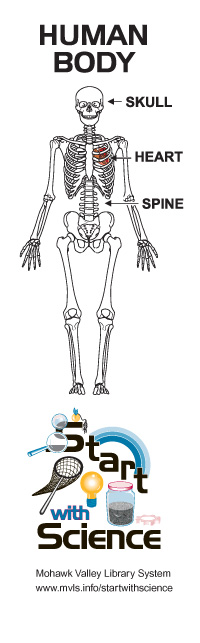
- To have children understand the terms: skull, spine, and skeleton.
- To have children be aware of how their skeleton is similar to that of other animals.
- To have children become aware of their bodies.
|
Books : (In kit)
- Look Inside Your Body by Gina Ingoglia
- Skeletons, Skeletons by Katy Hall
|
Equipment : (In kit)
- 1 Anatomy apron with velcroed parts
- 4 Human Body Charts
- Bones of the Human Body
- Muscles of the Human Body
- How Food is Digested
- Heart and Blood Circulation
- Dinosaur skeletons
- 5 Pocket microscopes (replacement bulbs included)
- 1 Skeleton model on stand
- 4 Black stamp pads
- 1 Package of rubber stamps (one 6” human body and 12 assorted body parts)
- 10 Stethoscopes
|
Consumables : (To be supplied by you)
- Alcohol wipes
- Back-up batteries for pocket microscope (2 size AA)
- Plain paper for stamping
|
Health
| Stethoscope ear pieces should be wiped with alcohol after each program. |
Resource Book : (Contact your local library to borrow)
- Wood, Robert W. What?: Experiments for the young scientist. TAB Books, 1994.
|
Bookmarks : (In kit)
Paper copies of the bookmark are included in the kit. PDF and JPEG copies are available here.
- PDF – 4 bookmarks per page. Ready to print in color.
- JPG – single high quality jpeg image.
|
Program
Objectives
- To have children understand the terms: skull, spine, and skeleton.
- To have children be aware of how their skeleton is similar to that of other animals.
- To have children become aware of their bodies.
- Introduction
- Start with general discussion about their bodies and see what terms they have for different parts.
- Start from the top of the head and work down for naming body parts. See if they can separate such as hair, then skin, then bone, then brains.
- Program
- Read SKELETONS, SKELETONS by Katy Hall, having children guess what animal belongs to each skeleton. (Don’t worry about holding the book to the light, it doesn’t work very well in a group.)
- Show human skeletons and see if they can name skull, spine, ribs, arms, legs, etc. Comment about skull protecting brain, ribs protecting heart, spine holding things together. Compare size and parts with skeletons of dinosaurs.
- Use charts to “open up” children. What holds them together? What is the next layer under the skin? What is under and through the muscles? What happens with your food? Finally back down to the skeleton.
- Put anatomy apron on a child and show where child’s internal organs are located. Have children feel for their own hearts, lungs, spine, etc.
- Ask how doctor checks them. Introduce stethoscopes, seeing if anyone knows what they are called.
- Have children listen to their hearts and breathing with their lungs. It may help to have them jump up and down first and realize how that increases their heartbeat. Pair up children to listen to each other.
- Show how to use pocket microscopes – these will need adult assistance. Turn on light. Place microscope right on object to view. Use dial on side to focus. Try to remind child to close the eye not looking down the microscope. This is great for looking at a piece of hair. It is easier to see if the hair is placed on a piece of paper. Compare different strands of hair. Compare with hair of an animal if there is one in the class. This is also good for looking at a piece of skin (yes, there are offers of scabs or peeling skin from the children). It does not work for something thick since the light is not strong enough to illuminate it.
- Use the stamps and stamp pads for children to create their own body part pictures on paper.
- General
- Discussion of the skull as protection for the brain is a perfect opportunity to discuss bike helmets as protection for the skull. They can see how the skull is on top and so you can stress wearing the helmets properly fitted on the top of the skull and firmly strapped on.
- It is important to wipe the ear pieces of the stethoscopes after classroom use. Alcohol on cotton balls works nicely.
|
Evaluation
Please print this evaluation, complete it and return to MVLS in the SWS red envelope.
Topics | About the Kits | Lending Policy